AList 开源项目地址:https://github.com/alist-org/alist
AList 文档:https://alist.nn.ci/zh/guide/
本地启动(在alist所在目录打开cmd):alist server
安装
默认安装在 /opt/alist 中。 自定义安装路径,将安装路径作为第二个参数添加,必须是绝对路径(如果路径以 alist 结尾,则直接安装到给定路径,否则会安装在给定路径 alist 目录下),如 安装到 /root:
1
2
3
4
5
6
| # Install
curl -fsSL "https://alist.nn.ci/v3.sh" | bash -s install /root
# update
curl -fsSL "https://alist.nn.ci/v3.sh" | bash -s update
# Uninstall
curl -fsSL "https://alist.nn.ci/v3.sh" | bash -s uninstall /root
|
- 启动:
systemctl start alist - 关闭:
systemctl stop alist - 状态:
systemctl status alist - 重启:
systemctl restart alist
安装完成后:
 1
 2
 3
 4
 5
 6
 7
 8
 9
10
11
12
13
14
15
16
17
18
19
| 访问地址:http://YOUR_IP:5244/
配置文件路径:/root/alist/data/config.json
---------如何获取密码?--------
先cd到alist所在目录:
cd /root/alist
随机设置新密码:
./alist admin random
或者手动设置新密码:
./alist admin set NEW_PASSWORD
----------------------------
启动服务中
查看状态:systemctl status alist
启动服务:systemctl start alist
重启服务:systemctl restart alist
停止服务:systemctl stop alist
温馨提示:如果端口无法正常访问,请检查 服务器安全组、本机防火墙、Alist状态
|
常用网盘见官方文档
挂载本机磁盘
挂载路径:/本地
根文件路径:/root
关闭显示隐藏
设置访客用户
访客基本路径设置为:/本地/共享
通过RaiDrive挂载网盘到本地电脑
RaiDrive官网:http://www.raidrive.com
挂载成功后,通过RaiDrive挂载各大网盘到本地电脑上
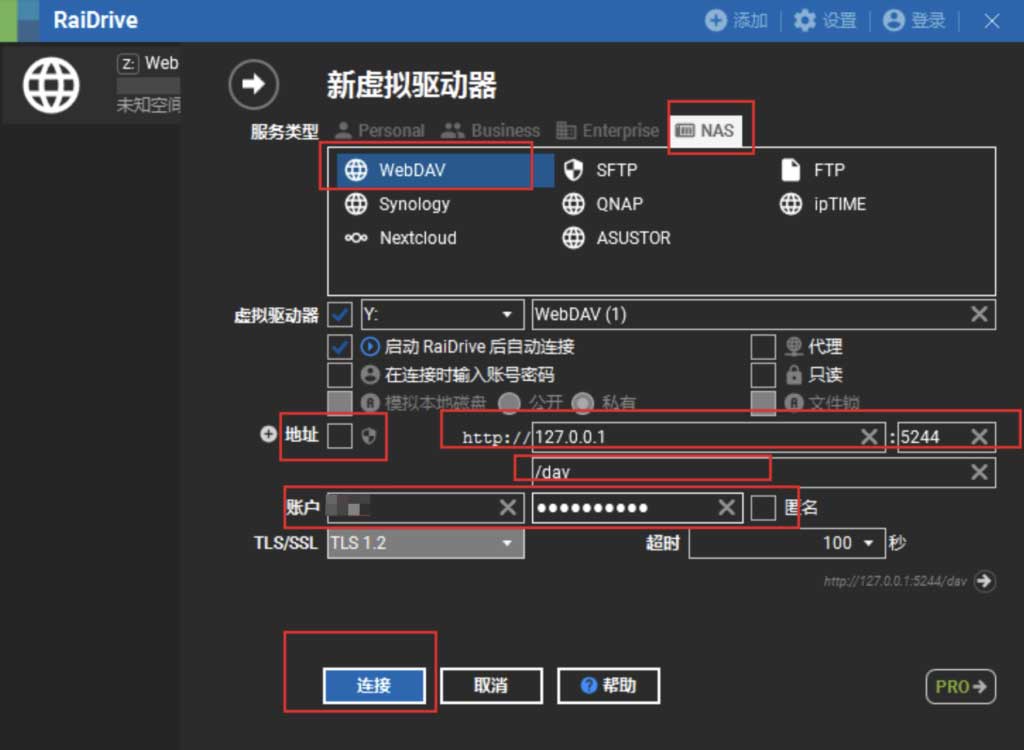
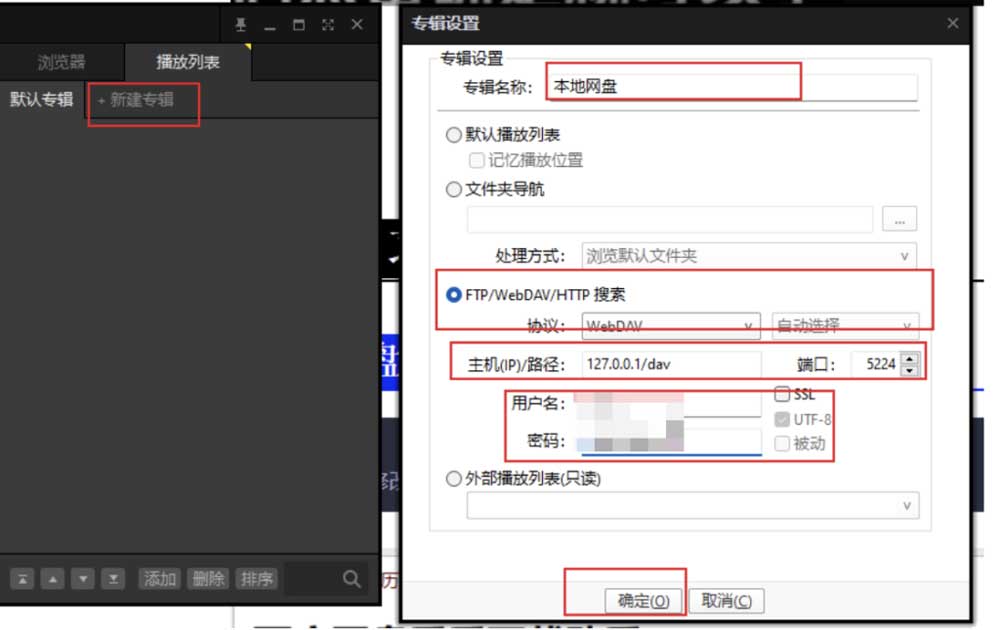
挂载到potplay
Potplayer播放器挂载alist网盘里的视频
挂载到安卓
安卓可以挂载到 es文件浏览器
我的网络—右上角三点—新建webdav
服务器:IP/dav/
端口:5244
用户名:admin
密码:
本地开机启动alist
1.在D:\alist-windows-amd64目录下新建aliststar.vbs:
1
2
| Set ws = CreateObject("Wscript.Shell")
ws.run "D:\alist-windows-amd64\alist.exe server",vbhide
|
2.新建aliststar.vbs快捷方式放到桌面。
3.win+R打开运行窗口,输入shell:startup
4.上面的快捷方式拖到打开的窗口
配置反代域名
1.安装nginx
1
2
3
| sudo apt install nginx -y
sudo systemctl start nginx
sudo systemctl enable nginx
|
2.为了便于申请证书,需要新建反代网站目录,一定不要在/root目录上新建
1
2
| mkdir -p /var/www/alist
cp /usr/share/nginx/html/* /var/www/alist
|
3.为了使下面申请证书时能访问 http://bore.vip/.well-known/acme-challenge/… 这个链接,首先配置好http://bore.vip/.well-known/acme-challenge/…这个链接,首先配置好Nginx 80 端口,保证上述网址能顺利访问,从而顺利申请证书。所以在 nginx 配置的 server 节点下添加:
1
2
3
| location ~ /.well-known {
allow all;
}
|
4.在网站配置文件的 server 字段中添加
1
2
3
4
5
6
7
8
9
10
11
12
| location / {
proxy_set_header X-Forwarded-For $proxy_add_x_forwarded_for;
proxy_set_header X-Forwarded-Proto $scheme;
proxy_set_header Host $http_host;
proxy_set_header X-Real-IP $remote_addr;
proxy_set_header Range $http_range;
proxy_set_header If-Range $http_if_range;
proxy_redirect off;
proxy_pass http://127.0.0.1:5244;
# the max size of file to upload
client_max_body_size 20000m;
}
|
最终修改为:
1
| vi /etc/nginx/conf.d/alist.conf
|
1
2
3
4
5
6
7
8
9
10
11
12
13
14
15
16
17
18
19
20
21
22
23
24
25
26
27
| server {
listen 80;
root /var/www/alist;
index index.html index.htm index.nginx-debian.html;
server_name alist.bore.vip;
#access_log /var/log/nginx/host.access.log main;
location / {
#try_files $uri $uri/ =404;
proxy_set_header X-Forwarded-For $proxy_add_x_forwarded_for;
proxy_set_header X-Forwarded-Proto $scheme;
proxy_set_header Host $http_host;
proxy_set_header X-Real-IP $remote_addr;
proxy_set_header Range $http_range;
proxy_set_header If-Range $http_if_range;
proxy_redirect off;
proxy_pass http://127.0.0.1:5244;
# the max size of file to upload
client_max_body_size 20000m;
}
location ~ /.well-known {
    allow all;
}
}
|
测试配置是否有问题:
重启 Nginx 生效:
1
| systemctl restart nginx
|
配置 SSL 证书
安装 Certbot
1
| sudo apt-get install letsencrypt -y
|
使用 webroot 自动生成证书
1
| certbot certonly --webroot -w /var/www/alist -d alist.bore.vip -m 455343442@qq.com --agree-tos
|
编辑 Nginx
1
| vi /etc/nginx/conf.d/alist.conf
|
 1
 2
 3
 4
 5
 6
 7
 8
 9
10
11
12
13
14
15
16
17
18
19
20
21
22
23
24
25
26
27
28
29
30
31
32
33
34
35
36
37
38
39
40
41
42
| server {
listen 80;
#listen [::]:80;
root /var/www/alist;
# Add index.php to the list if you are using PHP
index index.html index.htm index.nginx-debian.html;
server_name alist.bore.vip; # 此处的示例域名为qbt.example.com
location / {
#try_files $uri $uri/ =404;
proxy_set_header X-Forwarded-For $proxy_add_x_forwarded_for;
proxy_set_header X-Forwarded-Proto $scheme;
proxy_set_header Host $http_host;
proxy_set_header X-Real-IP $remote_addr;
proxy_set_header Range $http_range;
proxy_set_header If-Range $http_if_range;
proxy_redirect off;
proxy_pass http://127.0.0.1:5244;
# the max size of file to upload
client_max_body_size 20000m;
}
location ~ /.well-known {
allow all;
}
listen 443 ssl; # managed by Certbot
# RSA certificate
ssl_certificate /etc/letsencrypt/live/alist.bore.vip/fullchain.pem; # managed by Certbot
ssl_certificate_key /etc/letsencrypt/live/alist.bore.vip/privkey.pem; # managed by Certbot
# Redirect non-https traffic to https
if ($scheme != "https") {
return 301 https://$host$request_uri;
} # managed by Certbot
}
|
测试配置是否有问题:
重启 Nginx 生效:
1
| systemctl restart nginx
|
自动续期
Let’s Encrypt 的证书有效期为 90 天,不过我们可以通过 crontab 定时运行命令更新证书。
先运行以下命令来测试证书的自动更新:
1
| certbot renew --dry-run
|
如果一切正常,就可以编辑 crontab 定期运行以下命令:
1
| 30 2 * */2 * /usr/bin/certbot renew --quiet && /bin/systemctl restart nginx
|
查看证书有效期的命令:
1
| openssl x509 -noout -dates -in /etc/letsencrypt/live/alist.bore.vip/cert.pem
|
修改配置文件
1
| vi /root/alist/data/config.json
|
你可能注意到了,其中有 cert_file和key_file两条配置,正对应着上次申请证书最后输出的Certificate is saved at:和Key is saved at:,把后面的文件路径填进去,就配置好证书文件了
1
| systemctl restart alist
|
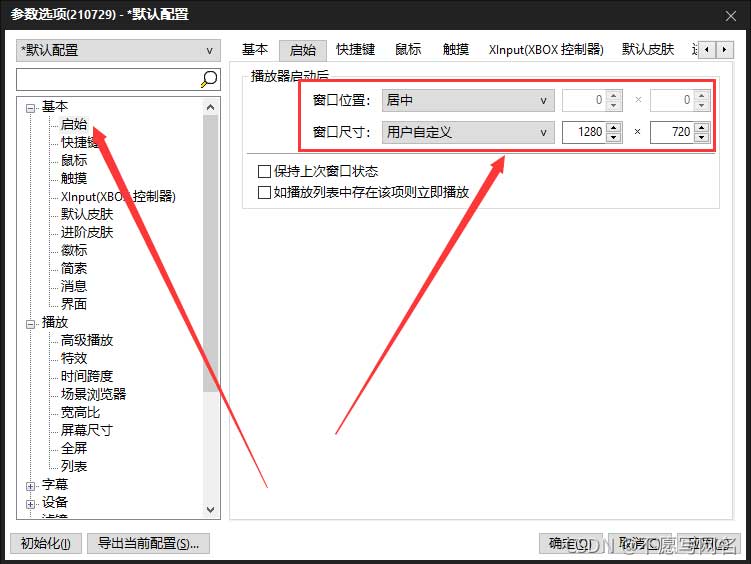
potplayer无边框透明美化
1.打开播放器按“F5”或右键PotPlayer播放界面点击选项进入设置界面,点开“基本”然后把启始项把窗口位置改成居中,把默认的320乘以240的窗口尺寸,建议1280乘以720,当然你也可以改成自己喜欢的尺寸
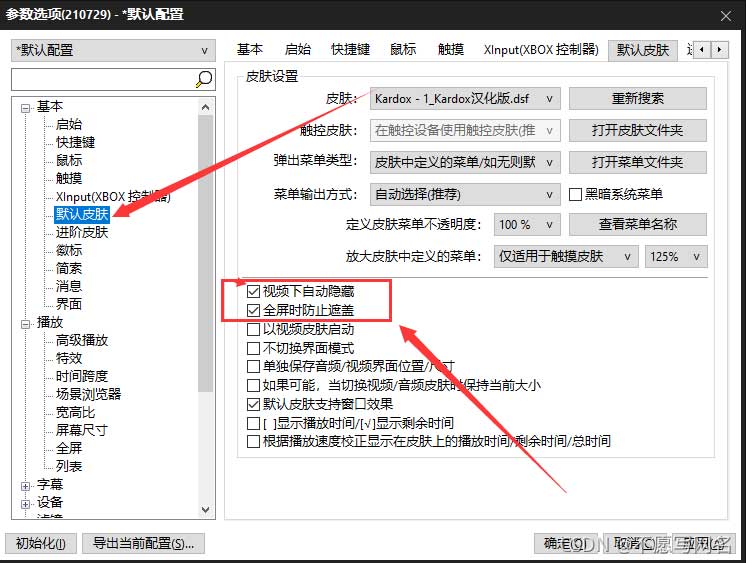
2.然后把默认皮肤下的视频下自动隐藏和全屏时防止遮盖进行勾选
3.接着把播放里面的窗口尺寸改成无边框尺寸
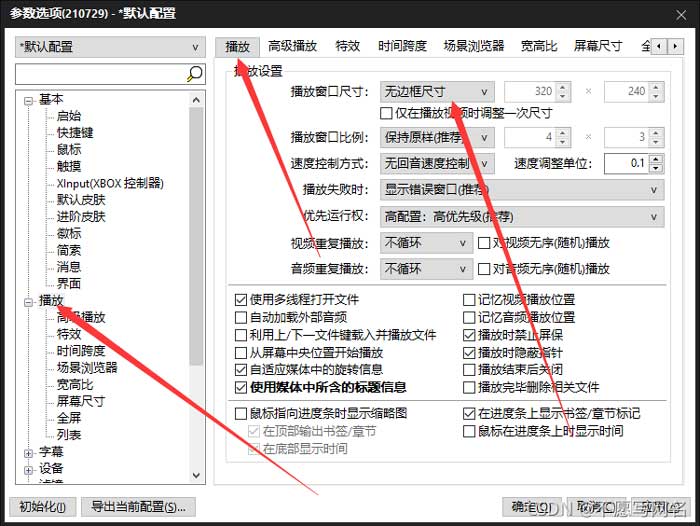
4.皮肤安装也非常简单,直接打开PotPlayer皮肤设置,然后选择打开皮肤文件夹,将下载的皮肤粘贴进去。
参考链接
1.Alist 挂载阿里云盘、百度网盘、迅雷云盘、123网盘等
2.部署AList私有云盘
3.letsencrypt免费证书申请–Certbot
4.potplayer无边框透明美化教程