自动同步Fork(现在用的)
参考chatgpt:
在你的 fork 仓库中新建:
1
| .github/workflows/sync.yml
|
内容如下(可直接复制):
 1
 2
 3
 4
 5
 6
 7
 8
 9
10
11
12
13
14
15
16
17
18
19
20
21
22
23
24
25
26
27
28
29
30
31
32
33
34
35
| name: Sync Upstream
on:
schedule:
- cron: '0 0 * * *' # 每天自动同步一次
workflow_dispatch: # 手动触发按钮
watch:
types: started
jobs:
sync:
runs-on: ubuntu-latest
steps:
- name: Checkout
uses: actions/checkout@v3
with:
fetch-depth: 0
- name: Add upstream
run: |
git remote add upstream https://github.com/上游用户名/上游仓库.git
git fetch upstream
- name: Configure Git
run: |
git config user.name "github-actions[bot]"
git config user.email "github-actions[bot]@users.noreply.github.com"
- name: Merge upstream
run: |
git merge upstream/main --allow-unrelated-histories || true
- name: Push
run: |
git push origin main
|
你需要修改两处:
1.把:
1
| https://github.com/上游用户名/上游仓库.git
|
替换成你要同步的上游仓库地址。
2.如果上游主分支不是 main(例如是 master),你要改:
为:
最终为:
 1
 2
 3
 4
 5
 6
 7
 8
 9
10
11
12
13
14
15
16
17
18
19
20
21
22
23
24
25
26
27
28
29
30
31
32
33
34
35
| name: Sync Upstream
on:
schedule:
- cron: '0 0 * * *' # 每天自动同步一次
workflow_dispatch: # 手动触发按钮
watch:
types: started
jobs:
sync:
runs-on: ubuntu-latest
steps:
- name: Checkout
uses: actions/checkout@v3
with:
fetch-depth: 0
- name: Add upstream
run: |
git remote add upstream https://github.com/上游用户名/上游仓库.git
git fetch upstream
- name: Configure Git
run: |
git config user.name "github-actions[bot]"
git config user.email "github-actions[bot]@users.noreply.github.com"
- name: Merge upstream
run: |
git merge upstream/master --allow-unrelated-histories || true
- name: Push
run: |
git push origin master
|
完成后:
- 每天凌晨自动同步上游更新
- 你也可以在 Actions 页面手动点击“Run workflow”
- 不需要手动处理冲突(脚本里
|| true 自动跳过错误)
自动同步Fork(以前用的)
创建新的workflow,在仓库右上角点Add file,先输入workflows文件夹名,再点击空白位置,自动进入下一目录,然后输入文件名sync.yml。接着
在sync.yml输入里面的内容:
 1
 2
 3
 4
 5
 6
 7
 8
 9
10
11
12
13
14
15
16
17
18
19
20
21
22
23
24
25
26
27
28
29
30
31
32
33
34
35
36
37
38
39
40
| name: Upstream Sync
permissions:
contents: write
on:
schedule:
- cron: "0 0 * * *" # every day
workflow_dispatch:
jobs:
sync_latest_from_upstream:
name: Sync latest commits from upstream repo
runs-on: ubuntu-latest
if: ${{ github.event.repository.fork }}
steps:
# Step 1: run a standard checkout action
- name: Checkout target repo
uses: actions/checkout@v3
# Step 2: run the sync action
- name: Sync upstream changes
id: sync
uses: aormsby/Fork-Sync-With-Upstream-action@v3.4
with:
upstream_sync_repo: ChatGPTNextWeb/ChatGPT-Next-Web
upstream_sync_branch: main
target_sync_branch: main
target_repo_token: ${{ secrets.GITHUB_TOKEN }} # automatically generated, no need to set
# Set test_mode true to run tests instead of the true action!!
test_mode: false
- name: Sync check
if: failure()
run: |
echo "[Error] 由于上游仓库的 workflow 文件变更,导致 GitHub 自动暂停了本次自动更新,你需要手动 Sync Fork 一次,详细教程请查看:https://github.com/Yidadaa/ChatGPT-Next-Web/blob/main/README_CN.md#%E6%89%93%E5%BC%80%E8%87%AA%E5%8A%A8%E6%9B%B4%E6%96%B0"
echo "[Error] Due to a change in the workflow file of the upstream repository, GitHub has automatically suspended the scheduled automatic update. You need to manually sync your fork. Please refer to the detailed tutorial for instructions: https://github.com/Yidadaa/ChatGPT-Next-Web#enable-automatic-updates"
exit 1
|
自动同步Fork(以以前用的)
虽然Github自带一个Sync Fork的按钮,但是每次都自己点总是麻烦的,所以有人搞了个Github Action来做这件事,https://github.com/tgymnich/fork-sync
创建workflow
创建新的workflow,在仓库右上角点Add file,先输入workflows文件夹名,再点击空白位置,自动进入下一目录,然后输入文件名sync.yml。接着
在sync.yml输入里面的内容:
官方:
 1
 2
 3
 4
 5
 6
 7
 8
 9
10
11
12
13
14
15
16
17
18
19
| name: Sync Fork
on:
schedule:
- cron: '*/30 * * * *' # every 30 minutes
workflow_dispatch: # on button click
jobs:
sync:
runs-on: ubuntu-latest
steps:
- uses: tgymnich/fork-sync@v2.0
with:
token: ${{ secrets.PERSONAL_TOKEN }}
owner: llvm
base: master
head: master
|
注释:
 1
 2
 3
 4
 5
 6
 7
 8
 9
10
11
12
13
14
15
16
| name: Sync Fork
on:
push: # push 时触发, 主要是为了测试配置有没有问题
schedule:
- cron: '* */24 * * *' # 每天一次
jobs:
repo-sync:
runs-on: ubuntu-latest
steps:
- uses: tgymnich/fork-sync@v2.0
with:
token: ${{ secrets.TOKEN }} #Github Token,记得加入secrets
owner: ngosang # fork 的上游仓库 user
head: master # fork 的上游仓库 branch
base: master # 本地仓库 branch
|
最终sync.yml
 1
 2
 3
 4
 5
 6
 7
 8
 9
10
11
12
13
14
15
16
17
18
19
| name: Sync Fork
on:
schedule:
- cron: '* */24 * * *' # 每天一次
workflow_dispatch: # on button click
jobs:
sync:
runs-on: ubuntu-latest
steps:
- uses: tgymnich/fork-sync@v2.0
with:
token: ${{ secrets.PERSONAL_TOKEN }}
owner: mack-a
base: master
head: master
|
* */24 * * *改成* */48 * * *每两天运行一次
PS:ChatGPT有时给出的答案可能是错误的,需要验证:crontab guru
创建github访问token
参考:管理个人访问令牌
1.在任何页面的右上角,单击个人资料照片,然后单击“设置”。
2.在左侧边栏中,单击“ 开发人员设置”。
3.请在左侧边栏的“ Personal access token”下,单击“细粒度令牌” 。
4.单击“生成新令牌”。
5.在“令牌名称”下,输入令牌的名称。
6.在“过期时间”下,选择令牌的过期时间(永不过期)。
7.然后权限要开启repo和workflow的权限
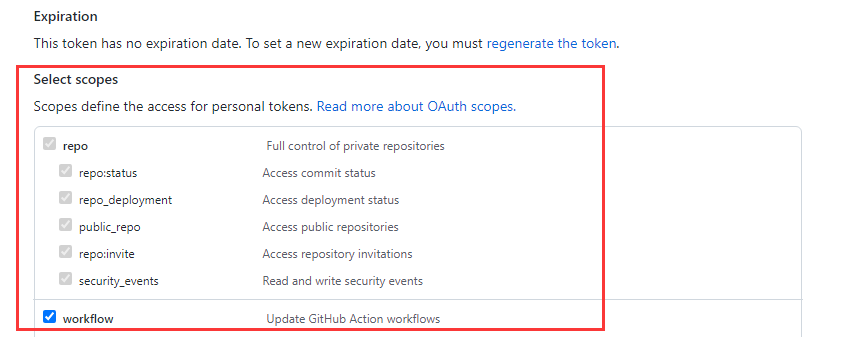
8.创建完成后复制token内容
添加环境变量secret
在settings/secrets(Secrets and variables)/actions里把Github的Token设置上,比如workflow写的是secrets.PERSONAL_TOKEN,所以添加的时候Name填写PERSONAL_TOKEN,Secret里填写上一步创建Token内容。
如果部署完成之后,运行显示错误是:
repo-sync
Failed to create or merge pull request: HttpError: Validation Failed: {“resource”:”PullRequest”,”code”:”custom”,”message”:”No commits between knight000:master and ngosang:master”}
就证明初步成功了,因为你部署了workflow所以比原仓库新,等原仓库更新后点Re-run jobs就可以测试是否正确部署了。
自动提交修改到Gitee(未测试)
以下action文件来自https://juejin.cn/post/6894928345830522887
把GITEE_PRIVATE_KEY、GITEE_TOKEN、GITEE_USER都添加到secrets里,然后Gitee内从URL导入仓库,创建同名仓库即可同步。
 1
 2
 3
 4
 5
 6
 7
 8
 9
10
11
12
13
14
15
16
17
18
19
20
21
22
23
24
25
26
27
28
29
30
31
32
33
34
| # 通过 Github actions, 在 Github 仓库的每一次 commit 后自动同步到 Gitee 上
name: sync2gitee
on:
push:
branches:
- master
jobs:
repo-sync:
env:
dst_key: ${{ secrets.GITEE_PRIVATE_KEY }}
dst_token: ${{ secrets.GITEE_TOKEN }}
gitee_user: ${{ secrets.GITEE_USER }}
runs-on: ubuntu-latest
steps:
- uses: actions/checkout@v2
with:
persist-credentials: false
- name: sync github -> gitee
uses: Yikun/hub-mirror-action@master
if: env.dst_key && env.dst_token && env.gitee_user
with:
# 必选,需要同步的 Github 用户(源)
src: 'github/${{ github.repository_owner }}'
# 必选,需要同步到的 Gitee 用户(目的)
dst: 'gitee/${{ secrets.GITEE_USER }}'
# 必选,Gitee公钥对应的私钥,https://gitee.com/profile/sshkeys
dst_key: ${{ secrets.GITEE_PRIVATE_KEY }}
# 必选,Gitee对应的用于创建仓库的token,https://gitee.com/profile/personal_access_tokens
dst_token: ${{ secrets.GITEE_TOKEN }}
# 如果是组织,指定组织即可,默认为用户 user
# account_type: org
# 直接取当前项目的仓库名
static_list: ${{ github.event.repository.name }}
|
因为有if: env.dst_key && env.dst_token && env.gitee_user这一句所以信息不足的情况下是会跳过执行,显示执行成功而不是显示错误,请注意。
自动同步Releases
1.创建新的workflow,在仓库右上角点Add file,先输入workflows文件夹名,再点击空白位置,自动进入下一目录,然后输入文件名Sync Upstream Releases.yaml。接着
在Sync Upstream Releases.yaml输入里面的内容:(注意修改UPSTREAM_OWNER和UPSTREAM_REPO,上游仓库拥有者和仓库名称)
  1
  2
  3
  4
  5
  6
  7
  8
  9
 10
 11
 12
 13
 14
 15
 16
 17
 18
 19
 20
 21
 22
 23
 24
 25
 26
 27
 28
 29
 30
 31
 32
 33
 34
 35
 36
 37
 38
 39
 40
 41
 42
 43
 44
 45
 46
 47
 48
 49
 50
 51
 52
 53
 54
 55
 56
 57
 58
 59
 60
 61
 62
 63
 64
 65
 66
 67
 68
 69
 70
 71
 72
 73
 74
 75
 76
 77
 78
 79
 80
 81
 82
 83
 84
 85
 86
 87
 88
 89
 90
 91
 92
 93
 94
 95
 96
 97
 98
 99
100
101
102
103
104
105
106
107
108
109
110
111
112
113
114
115
116
117
118
119
120
121
122
123
124
125
126
127
128
129
130
131
132
133
134
135
136
137
| # 同步上游仓库全部 release(包括最新版)
# 说明:
# - 会分页获取上游仓库的所有 releases(per_page=100),逐个检查本仓库是否已有相同 tag。
# - 若本仓库不存在该 tag 的 release,则会:
# 1) 下载上游 release 的所有 assets(放到 upstream-assets/<tag>/)
# 2) 通过 GitHub Releases API 在当前仓库创建同名 release(保留 name、body、draft、prerelease)
# 3) 上传对应的 assets 到新创建的 release
# - 定时与手动触发均支持。请确保本仓库的 secrets.GITHUB_TOKEN 有权限创建 release 与上传资产。
name: Sync Upstream Releases
on:
workflow_dispatch: {}
schedule:
- cron: "0 0 * * *" # every day
concurrency:
group: sync-upstream-releases
cancel-in-progress: false
jobs:
sync-releases:
runs-on: ubuntu-latest
env:
UPSTREAM_OWNER: Decohererk
UPSTREAM_REPO: DecoTV
PER_PAGE: "100"
steps:
- name: Checkout repo (needed for GitHub context)
uses: actions/checkout@v4
- name: Install dependencies
run: |
sudo apt-get update -y
sudo apt-get install -y jq
- name: Sync all upstream releases to this repo
env:
GH_TOKEN: ${{ secrets.GITHUB_TOKEN }}
GITHUB_REPOSITORY: ${{ github.repository }}
run: |
set -euo pipefail
UPSTREAM="${UPSTREAM_OWNER}/${UPSTREAM_REPO}"
echo "Syncing releases from $UPSTREAM into ${GITHUB_REPOSITORY}"
mkdir -p upstream-assets
page=1
while true; do
echo "Fetching releases page $page"
releases=$(curl -s -H "Authorization: token $GH_TOKEN" \
"https://api.github.com/repos/${UPSTREAM_OWNER}/${UPSTREAM_REPO}/releases?per_page=${PER_PAGE}&page=${page}")
# 如果本页没有条目则结束
count=$(echo "$releases" | jq 'length')
if [ "$count" -eq 0 ]; then
echo "No more releases (page $page empty)."
break
fi
echo "Processing $count releases from page $page"
echo "$releases" | jq -c '.[]' | while read -r rel; do
tag_name=$(echo "$rel" | jq -r '.tag_name')
# 防止空 tag
if [ -z "$tag_name" ] || [ "$tag_name" = "null" ]; then
echo "Skipping release with empty tag"
continue
fi
release_name=$(echo "$rel" | jq -r '.name // ""')
release_body=$(echo "$rel" | jq -r '.body // ""')
draft=$(echo "$rel" | jq -r '.draft')
prerelease=$(echo "$rel" | jq -r '.prerelease')
echo "Checking tag $tag_name..."
status_code=$(curl -s -o /dev/null -w "%{http_code}" -H "Authorization: token $GH_TOKEN" \
"https://api.github.com/repos/${GITHUB_REPOSITORY}/releases/tags/${tag_name}")
if [ "$status_code" -eq 200 ]; then
echo "Release with tag $tag_name already exists in ${GITHUB_REPOSITORY}, skipping."
continue
fi
echo "Downloading assets for $tag_name (if any)..."
safe_dir="upstream-assets/$(echo "$tag_name" | sed 's/[^A-Za-z0-9._-]/_/g')"
mkdir -p "$safe_dir"
echo "$rel" | jq -r '.assets[]?.browser_download_url' | while read -r asset_url; do
if [ -z "$asset_url" ] || [ "$asset_url" = "null" ]; then
continue
fi
fname=$(basename "$asset_url")
echo " - Downloading $fname"
# 使用 -L 跟随重定向
curl -sL -H "Authorization: token $GH_TOKEN" "$asset_url" -o "${safe_dir}/${fname}"
done
echo "Creating release $tag_name in ${GITHUB_REPOSITORY}..."
# 构造 payload(保留 draft & prerelease)
payload=$(jq -nc --arg tag "$tag_name" --arg name "$release_name" --arg body "$release_body" \
--argjson draft "$draft" --argjson prerelease "$prerelease" \
'{ tag_name: $tag, name: $name, body: $body, draft: $draft, prerelease: $prerelease }')
create_resp=$(curl -s -H "Authorization: token $GH_TOKEN" -H "Accept: application/vnd.github.v3+json" \
-d "$payload" "https://api.github.com/repos/${GITHUB_REPOSITORY}/releases")
upload_url=$(echo "$create_resp" | jq -r '.upload_url // empty')
message=$(echo "$create_resp" | jq -r '.message // empty')
if [ -z "$upload_url" ]; then
echo "Failed to create release for $tag_name: $message"
# 继续处理下一个 release,而不是退出整个流程
continue
fi
echo "Upload URL obtained. Uploading assets for $tag_name..."
if compgen -G "${safe_dir}/*" > /dev/null; then
for f in "${safe_dir}"/*; do
[ -f "$f" ] || continue
fname=$(basename "$f")
echo " - Uploading $fname ..."
# upload_url 包含 "{?name,label}",去掉括号部分并附加 ?name=...
upload_endpoint="${upload_url%\{*}?name=${fname}"
curl -s --fail -X POST -H "Authorization: token $GH_TOKEN" \
-H "Content-Type: application/octet-stream" --data-binary @"$f" "$upload_endpoint" \
|| echo " Warning: failed to upload asset $fname for $tag_name"
done
else
echo " - No assets to upload for $tag_name."
fi
echo "Release $tag_name created successfully (if no errors above)."
done
page=$((page + 1))
done
echo "All pages processed."
|
2.手动运行Action里面的Sync Upstream Releases
新建一仓库专门备份Releases
新建脚本生成release-sync.yml
1.新建仓库:https://github.com/iwyang/backup
2.本地任意一文件夹新建脚本:setup_backup.sh,双击运行,它会帮你自动创建Workflow 文件,并将源码上传到指定仓库。
PS:双击第一次会闪退,要双击第二次,第一次上传部署成功后,以后只用在网页修改release-sync.yml,增加备份仓库信息即可。
  1
  2
  3
  4
  5
  6
  7
  8
  9
 10
 11
 12
 13
 14
 15
 16
 17
 18
 19
 20
 21
 22
 23
 24
 25
 26
 27
 28
 29
 30
 31
 32
 33
 34
 35
 36
 37
 38
 39
 40
 41
 42
 43
 44
 45
 46
 47
 48
 49
 50
 51
 52
 53
 54
 55
 56
 57
 58
 59
 60
 61
 62
 63
 64
 65
 66
 67
 68
 69
 70
 71
 72
 73
 74
 75
 76
 77
 78
 79
 80
 81
 82
 83
 84
 85
 86
 87
 88
 89
 90
 91
 92
 93
 94
 95
 96
 97
 98
 99
100
101
102
103
104
105
106
107
108
109
110
111
112
113
114
115
116
117
118
119
120
121
122
123
124
125
126
127
128
129
130
131
132
133
134
135
136
137
138
139
140
141
142
143
144
145
146
147
148
149
| name: Release Sync
permissions:
contents: write
on:
push:
branches:
- main
workflow_dispatch:
inputs:
force_resync:
description: '是否强制重新同步所有项目'
required: false
default: 'false'
schedule:
- cron: '0 3 * * *'
jobs:
sync-by-real-time:
runs-on: ubuntu-latest
steps:
- name: Checkout
uses: actions/checkout@v4
with:
fetch-depth: 0
- name: Time-Travel Sync
env:
GH_TOKEN: ${{ secrets.GITHUB_TOKEN }}
FORCE_SYNC: ${{ github.event.inputs.force_resync }}
run: |
# 定义项目列表:格式为 "上游仓库|本地别名"
repos=(
"2dust/v2rayN|v2rayN"
"2dust/v2rayNG|v2rayNG"
"orion-lib/OrionTV|OrionTV"
"zbezj/HEU_KMS_Activator|HEU_KMS"
"eritpchy/FingerprintPay|FingerprintPay"
"connectbot/connectbot|connectbot"
"koreader/koreader|koreader"
"Dr-TSNG/ZygiskNext|ZygiskNext"
"JingMatrix/LSPosed|LSPosed"
"Xposed-Modules-Repo/com.y7.fingerpay|com.y7.fingerpay"
"twoone-3/AdGuardHomeForRoot|AdGuardHomeForRoot"
)
echo "正在获取各项目原作者发布时间..."
rm -f repo_list.txt
for item in "${repos[@]}"; do
src=$(echo "$item" | cut -d'|' -f1)
alias=$(echo "$item" | cut -d'|' -f2)
# 获取上游最新发布的发布时间
pub_date=$(gh release view "$src" --json publishedAt --jq .publishedAt 2>/dev/null || echo "1970-01-01T00:00:00Z")
echo "$pub_date|$src|$alias" >> repo_list.txt
done
# 【降序排列】:加入 -r 参数,按照时间从新到旧处理,确保最新版排在最上面
sort -t'|' -k1,1 -r repo_list.txt -o repo_list_sorted.txt
git config user.name "github-actions[bot]"
git config user.email "github-actions[bot]@users.noreply.github.com"
total_items=$(wc -l < repo_list_sorted.txt)
current_index=0
while IFS='|' read -r date src alias; do
current_index=$((current_index + 1))
echo "=========================================="
echo "正在处理 [$current_index/$total_items]: $alias (原作者更新于: $date)"
# 获取上游最新的 Tag 名
ORIGINAL_TAG=$(gh release view --repo "$src" --json tagName --jq .tagName)
NEW_TAG="${alias}-${ORIGINAL_TAG}"
# 检查本地是否已经存在该版本(如果不是强制同步)
if [ "$FORCE_SYNC" != "true" ]; then
if gh release view "$NEW_TAG" > /dev/null 2>&1; then
echo "跳过已存在的最新版: $alias ($ORIGINAL_TAG)"
continue
fi
fi
# ==== 清理该项目的所有历史 Release 和 Tag ====
echo "正在清理 [$alias] 的所有历史旧版本..."
OLD_TAGS=$(gh release list --limit 100 --json tagName --jq ".[].tagName" | grep "^${alias}-" || true)
for OLD_TAG in $OLD_TAGS; do
echo "删除旧版本: $OLD_TAG"
gh release delete "$OLD_TAG" --yes --cleanup-tag 2>/dev/null || true
done
gh release delete "$NEW_TAG" --yes --cleanup-tag 2>/dev/null || true
# 【时间穿越】:注入原始发布时间到 Git 提交
export GIT_AUTHOR_DATE="$date"
export GIT_COMMITTER_DATE="$date"
git commit --allow-empty -m "Release $alias $ORIGINAL_TAG"
git pull --rebase origin main || true
git push origin main
# 下载上游资源
mkdir -p ./temp_assets && rm -rf ./temp_assets/*
gh release download "$ORIGINAL_TAG" --repo "$src" --pattern "*" --dir ./temp_assets || echo "此版本无资源文件可供下载"
# ==== 核心修改:获取 Release 标题和正文(更新日志) ====
# 一次性获取标题(name)和内容(body)
RELEASE_INFO=$(gh release view "$ORIGINAL_TAG" --repo "$src" --json name,body)
TITLE=$(echo "$RELEASE_INFO" | jq -r .name)
UPSTREAM_BODY=$(echo "$RELEASE_INFO" | jq -r .body)
if [ -z "$TITLE" ] || [ "$TITLE" == "null" ]; then
TITLE="$ORIGINAL_TAG"
fi
CLEAN_DATE=$(echo "$date" | tr 'T' ' ' | tr -d 'Z')
SYNC_TIME=$(date '+%Y-%m-%d %H:%M:%S')
# 生成新的发布说明:包含元数据和原始更新日志,并使用 details 标签折叠
cat << EOF > release_notes.md
**Upstream Release:** [🔗 $src@$ORIGINAL_TAG](https://github.com/$src/releases/tag/$ORIGINAL_TAG) | **Upstream Update:** $CLEAN_DATE | **Sync Date:** $SYNC_TIME
---
<details>
<summary><b>点击展开 / 折叠原作者更新日志</b></summary>
$UPSTREAM_BODY
</details>
EOF
# ========================================================
# 创建新的 Release (由于是降序排列,第一个处理的即为最新,打上 latest 标签)
if [ "$current_index" -eq 1 ]; then
echo "创建并标记为最新的 Release..."
gh release create "$NEW_TAG" ./temp_assets/* \
--title "[$alias] $TITLE" \
--notes-file release_notes.md \
--latest
else
echo "创建 Release..."
gh release create "$NEW_TAG" ./temp_assets/* \
--title "[$alias] $TITLE" \
--notes-file release_notes.md \
--latest=false
fi
echo "$alias 同步完成!"
sleep 2
done < repo_list_sorted.txt
|
直接新建release-sync.yml
  1
  2
  3
  4
  5
  6
  7
  8
  9
 10
 11
 12
 13
 14
 15
 16
 17
 18
 19
 20
 21
 22
 23
 24
 25
 26
 27
 28
 29
 30
 31
 32
 33
 34
 35
 36
 37
 38
 39
 40
 41
 42
 43
 44
 45
 46
 47
 48
 49
 50
 51
 52
 53
 54
 55
 56
 57
 58
 59
 60
 61
 62
 63
 64
 65
 66
 67
 68
 69
 70
 71
 72
 73
 74
 75
 76
 77
 78
 79
 80
 81
 82
 83
 84
 85
 86
 87
 88
 89
 90
 91
 92
 93
 94
 95
 96
 97
 98
 99
100
101
102
103
104
105
106
107
108
109
110
111
112
113
114
115
116
117
118
119
120
121
122
123
124
125
126
127
128
129
130
131
132
133
134
135
136
137
138
139
140
141
142
| name: Release Sync
permissions:
contents: write
on:
push:
branches:
- main
workflow_dispatch:
inputs:
force_resync:
description: '是否强制重新同步所有项目'
required: false
default: 'false'
schedule:
- cron: '0 3 * * *'
jobs:
sync-by-real-time:
runs-on: ubuntu-latest
steps:
- name: Checkout
uses: actions/checkout@v4
with:
fetch-depth: 0
- name: Time-Travel Sync
env:
GH_TOKEN: ${{ secrets.GITHUB_TOKEN }}
FORCE_SYNC: ${{ github.event.inputs.force_resync }}
run: |
repos=(
"2dust/v2rayN|v2rayN"
"2dust/v2rayNG|v2rayNG"
"orion-lib/OrionTV|OrionTV"
"zbezj/HEU_KMS_Activator|HEU_KMS"
"eritpchy/FingerprintPay|FingerprintPay"
"connectbot/connectbot|connectbot"
"koreader/koreader|koreader"
"Dr-TSNG/ZygiskNext|ZygiskNext"
"JingMatrix/LSPosed|LSPosed"
"Xposed-Modules-Repo/com.y7.fingerpay|com.y7.fingerpay"
"twoone-3/AdGuardHomeForRoot|AdGuardHomeForRoot"
)
echo "正在获取各项目原作者发布时间..."
rm -f repo_list.txt
for item in "${repos[@]}"; do
src=$(echo "$item" | cut -d'|' -f1)
alias=$(echo "$item" | cut -d'|' -f2)
# 获取发布时间
pub_date=$(gh release view --repo "$src" --json publishedAt --jq .publishedAt 2>/dev/null || echo "1970-01-01T00:00:00Z")
echo "$pub_date|$src|$alias" >> repo_list.txt
done
# 核心修改:使用 -r 倒序排序(按时间从新到旧),确保最新的版本最先被处理并固定在顶部
sort -t'|' -k1,1 -r repo_list.txt -o repo_list_sorted.txt
git config user.name "github-actions[bot]"
git config user.email "github-actions[bot]@users.noreply.github.com"
total_items=$(wc -l < repo_list_sorted.txt)
current_index=0
while IFS='|' read -r date src alias; do
current_index=$((current_index + 1))
echo "=========================================="
echo "正在处理 [$current_index/$total_items]: $alias"
ORIGINAL_TAG=$(gh release view --repo "$src" --json tagName --jq .tagName)
NEW_TAG="${alias}-${ORIGINAL_TAG}"
if [ "$FORCE_SYNC" != "true" ]; then
if gh release view "$NEW_TAG" > /dev/null 2>&1; then
echo "跳过已存在的版本: $alias ($ORIGINAL_TAG)"
continue
fi
fi
# 清理旧版本
OLD_TAGS=$(gh release list --limit 100 --json tagName --jq ".[].tagName" | grep "^${alias}-" || true)
for OLD_TAG in $OLD_TAGS; do
gh release delete "$OLD_TAG" --yes --cleanup-tag 2>/dev/null || true
done
gh release delete "$NEW_TAG" --yes --cleanup-tag 2>/dev/null || true
# 时间穿越提交
export GIT_AUTHOR_DATE="$date"
export GIT_COMMITTER_DATE="$date"
git commit --allow-empty -m "Release $alias $ORIGINAL_TAG"
git pull --rebase origin main || true
git push origin main
# 下载资源
mkdir -p ./temp_assets && rm -rf ./temp_assets/*
gh release download "$ORIGINAL_TAG" --repo "$src" --pattern "*" --dir ./temp_assets || echo "此版本无资源文件可供下载"
# 获取标题和更新日志
RELEASE_JSON=$(gh release view "$ORIGINAL_TAG" --repo "$src" --json name,body)
TITLE=$(echo "$RELEASE_JSON" | jq -r .name)
[ -z "$TITLE" ] || [ "$TITLE" == "null" ] && TITLE="$ORIGINAL_TAG"
echo "$RELEASE_JSON" | jq -r .body > upstream_body.txt
CLEAN_DATE=$(echo "$date" | tr 'T' ' ' | tr -d 'Z')
SYNC_TIME=$(date '+%Y-%m-%d %H:%M:%S')
# 生成 release_notes.md,并将更新日志放入折叠块中
echo "**Upstream Release:** [🔗 $src@$ORIGINAL_TAG](https://github.com/$src/releases/tag/$ORIGINAL_TAG) | **Upstream Update:** $CLEAN_DATE | **Sync Date:** $SYNC_TIME" > release_notes.md
echo -e "\n---\n" >> release_notes.md
echo "<details>" >> release_notes.md
echo "<summary><b>点击展开 / 折叠原作者更新日志</b></summary>" >> release_notes.md
echo "" >> release_notes.md
cat upstream_body.txt >> release_notes.md
echo "" >> release_notes.md
echo "</details>" >> release_notes.md
# 核心修改:由于现在是最新的排在最前面,所以当 current_index 为 1 时打上 latest 标签
LATEST_FLAG="--latest=false"
if [ "$current_index" -eq 1 ]; then
LATEST_FLAG="--latest"
fi
# 资产附件检测:如果有文件则上传,没文件则仅创建 Release
ASSET_COUNT=$(ls -A ./temp_assets | wc -l)
if [ "$ASSET_COUNT" -gt 0 ]; then
echo "正在创建 Release 并上传 $ASSET_COUNT 个附件..."
gh release create "$NEW_TAG" ./temp_assets/* \
--title "[$alias] $TITLE" \
--notes-file release_notes.md \
$LATEST_FLAG
else
echo "未发现附件,仅创建 Release 页面..."
gh release create "$NEW_TAG" \
--title "[$alias] $TITLE" \
--notes-file release_notes.md \
$LATEST_FLAG
fi
echo "$alias 同步完成!"
sleep 2
done < repo_list_sorted.txt
|
更新代码后,去网页端点 Run workflow,把 force_resync 填为 true,跑一次。
参考链接